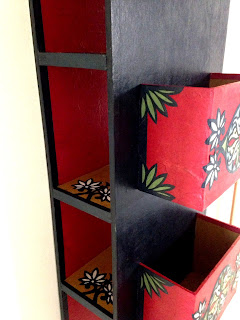
 For the last few months, I have been working (on and off) on this imposing piece. For those of you wondering : it's a traditional Korean wall organizer - called a "go-bee" (고비) in Korean - originally designed to hold calligraphy paper, brushes and other documents.
The openings on the back were traditionally meant to welcome long rolls of calligraphy paper and the front boxes (that I like to call "balconies!") were designed to file letters and other paperwork.
In our modern days, very few of us need a wall-mounted cabinet to hold our calligraphy rolls and brushes... Nonetheless, it's still a gorgeous piece that I decided to "attack," after seeing a few stunning examples in Hanji exhibits and museums.
Additionally, with the constant and overwhelming clutter that takes over my house, why not give the old-fashioned scholar's organizer a try?
Where to begin?
The biggest challenge for me, for a piece like that, is where to begin. How to choose the right pattern? How to calculate accurately the dimensions of all the trim and designs I'll need to make this piece truly unique? Most importantly, how not to get discouraged?
It took me a long time, and quite a few unfruitful attempts, to finally settle on a primary-colored theme, and traditional floral designs.
.jpeg) |
| The original pattern, found in a Korean pattern book. |
I found in a Korean pattern book a design that piqued my interest; I decided to play with it, deconstruct it and use the different elements of the pattern on different parts of the wall organizer.
 |
| Each balcony displays this intricate flower pattern. |
 I also separated the palm-like leaves from the central part of the design, and placed them on the sides of the three balconies. You can only see them when you look at the wall organizer from an angle.
Take out your ruler!
This piece presented another big challenge for me. On top of being the largest item I had ever worked on, it also required very precise and accurate alignment during assembly.


Usually, the objects I cover with Hanji paper are assembled prior to any application of the paper : I put the box or the pen holder together, and then I cover it with Hanji paper. In this case, I had covered all the different parts of the wall organizer before gluing them together.
When the time came to assemble the wall organizer, I had to measure precisely, in order to place the shelves and balconies correctly (Ah! That's why we have to learn math in school! ;).
Making sure that all the pieces were glued at perfect 90-degree angles was also essential...and not as easy at it seems! Also, when you work with instant setting glue, you don't have a second chance if you mess up the first time.

Luckily, I was helped by my dear friends Mandy and Lee, who were wonderfully supportive throughout the whole process! With four hands, three rulers, a measuring tape, lots of patience and reminiscences of high-school math we were able to assemble it without any problems.
The final touch
.JPG) The last step of this project was to varnish the wall organizer. It took a surprising large amount of time to do it, but in the end the result is impressive.
The last step of this project was to varnish the wall organizer. It took a surprising large amount of time to do it, but in the end the result is impressive.
Now, this amazing piece is hung proudly in my house, ready to welcome documents, letters, pencils and pens, or whatever we feel like filling it up with...
Clutter has never looked so good!

ReplyDeleteUseful info. Fortunate me I discovered your web site unintentionally, and I am stunned why this coincidence did not took place earlier! I bookmarked it. gmail login